
ESP32 LVGL配置教程
Published: Post views:ESP32 LVGL配置教程
- 基于VScode+PlatformIO+Arduino框架开发
0. 硬件
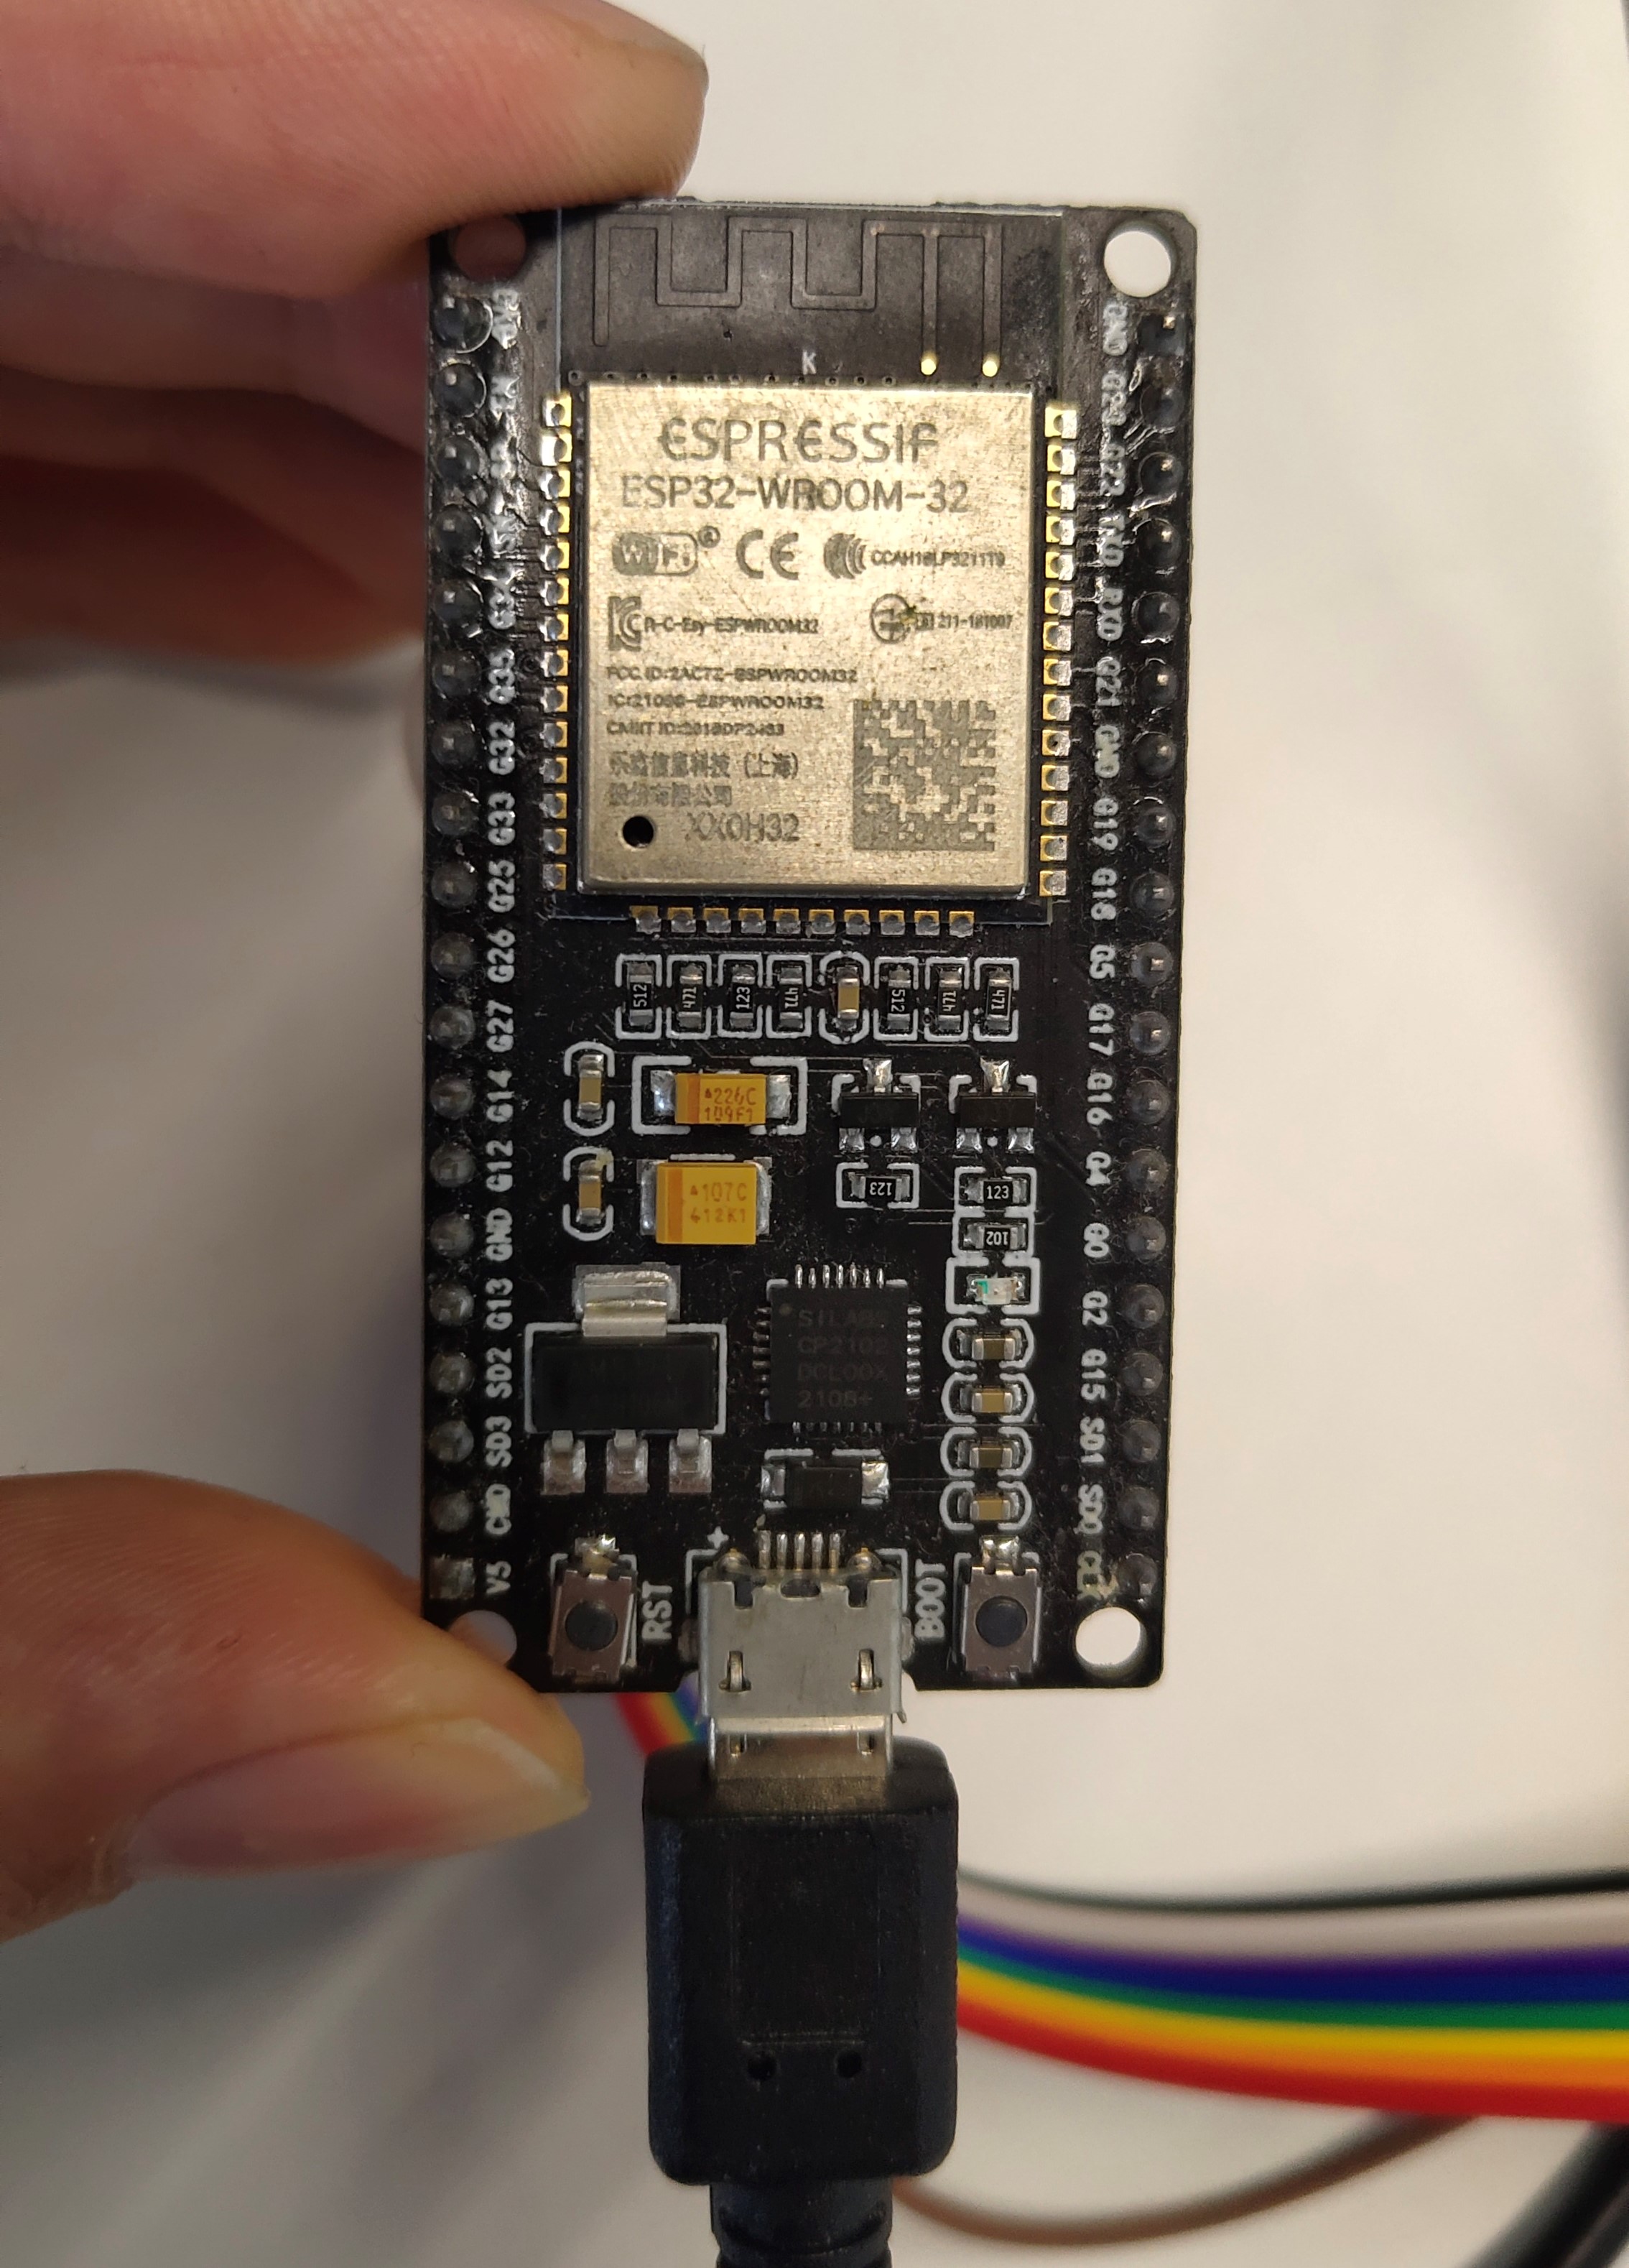
0.1 硬件实物
- ESP32 dev
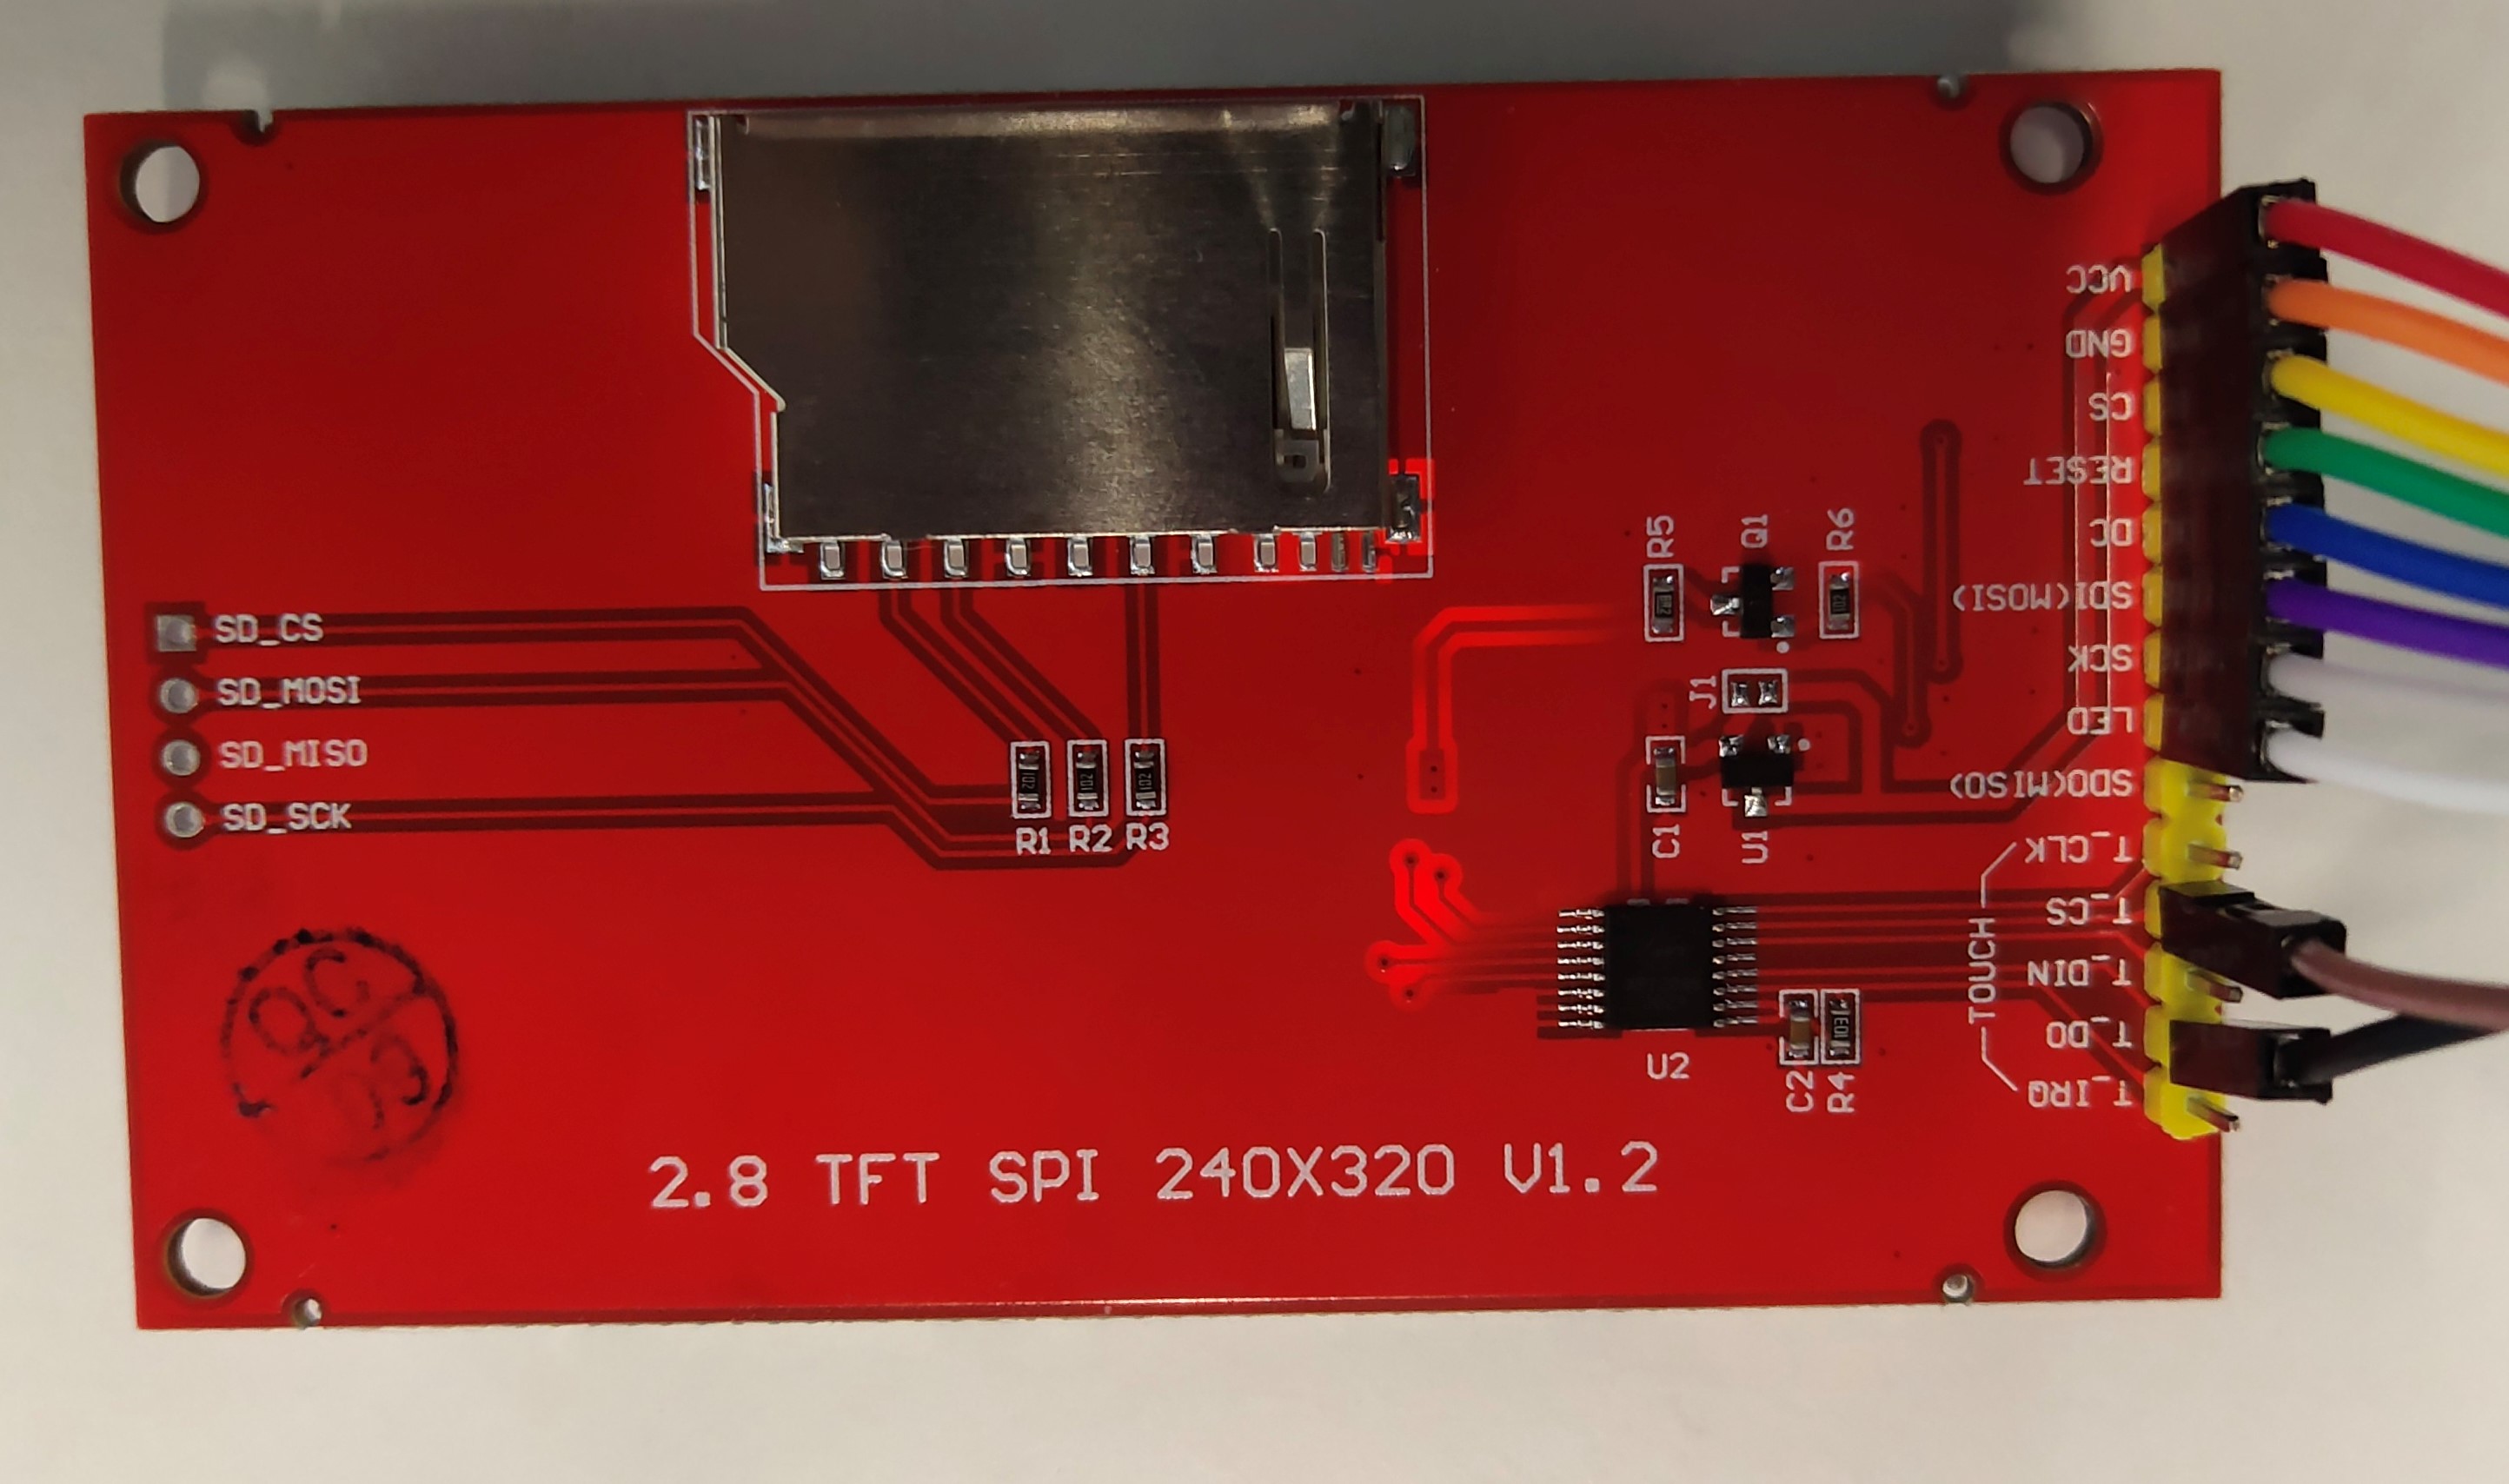
- 电阻触摸屏(驱动芯片是ILI9341)
0.2 接线图
-
需要了解,TFT屏幕和触摸是两部分
-
在本例中,屏幕显示和触摸功能都是采用SPI进行通讯;因此首先短接TFT触摸屏的SDI和CLK,也就是数据从线和时钟线。
-
对应引脚为:T_DIN与SDI短接;T_CLK与SCK短接;
-
至于什么不短接SDO与T_DO呢?
-
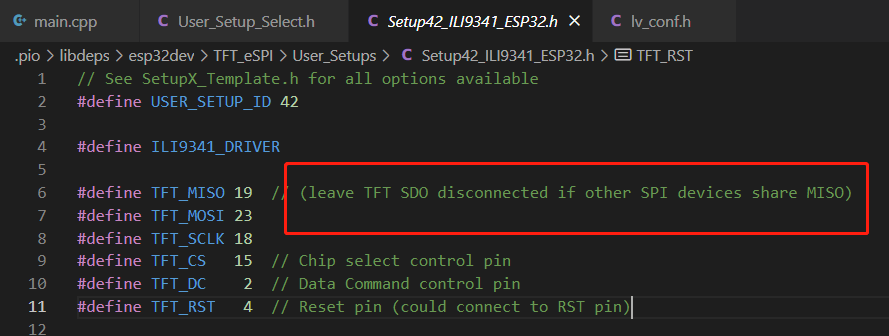
如下图,因为TFT_eSPI的文件中写明了,如果存在其他SPI设备共享MISO接口,TFT屏幕的SDO是不需要连接的。而我们的触摸传感器,是一种SPI设备
-
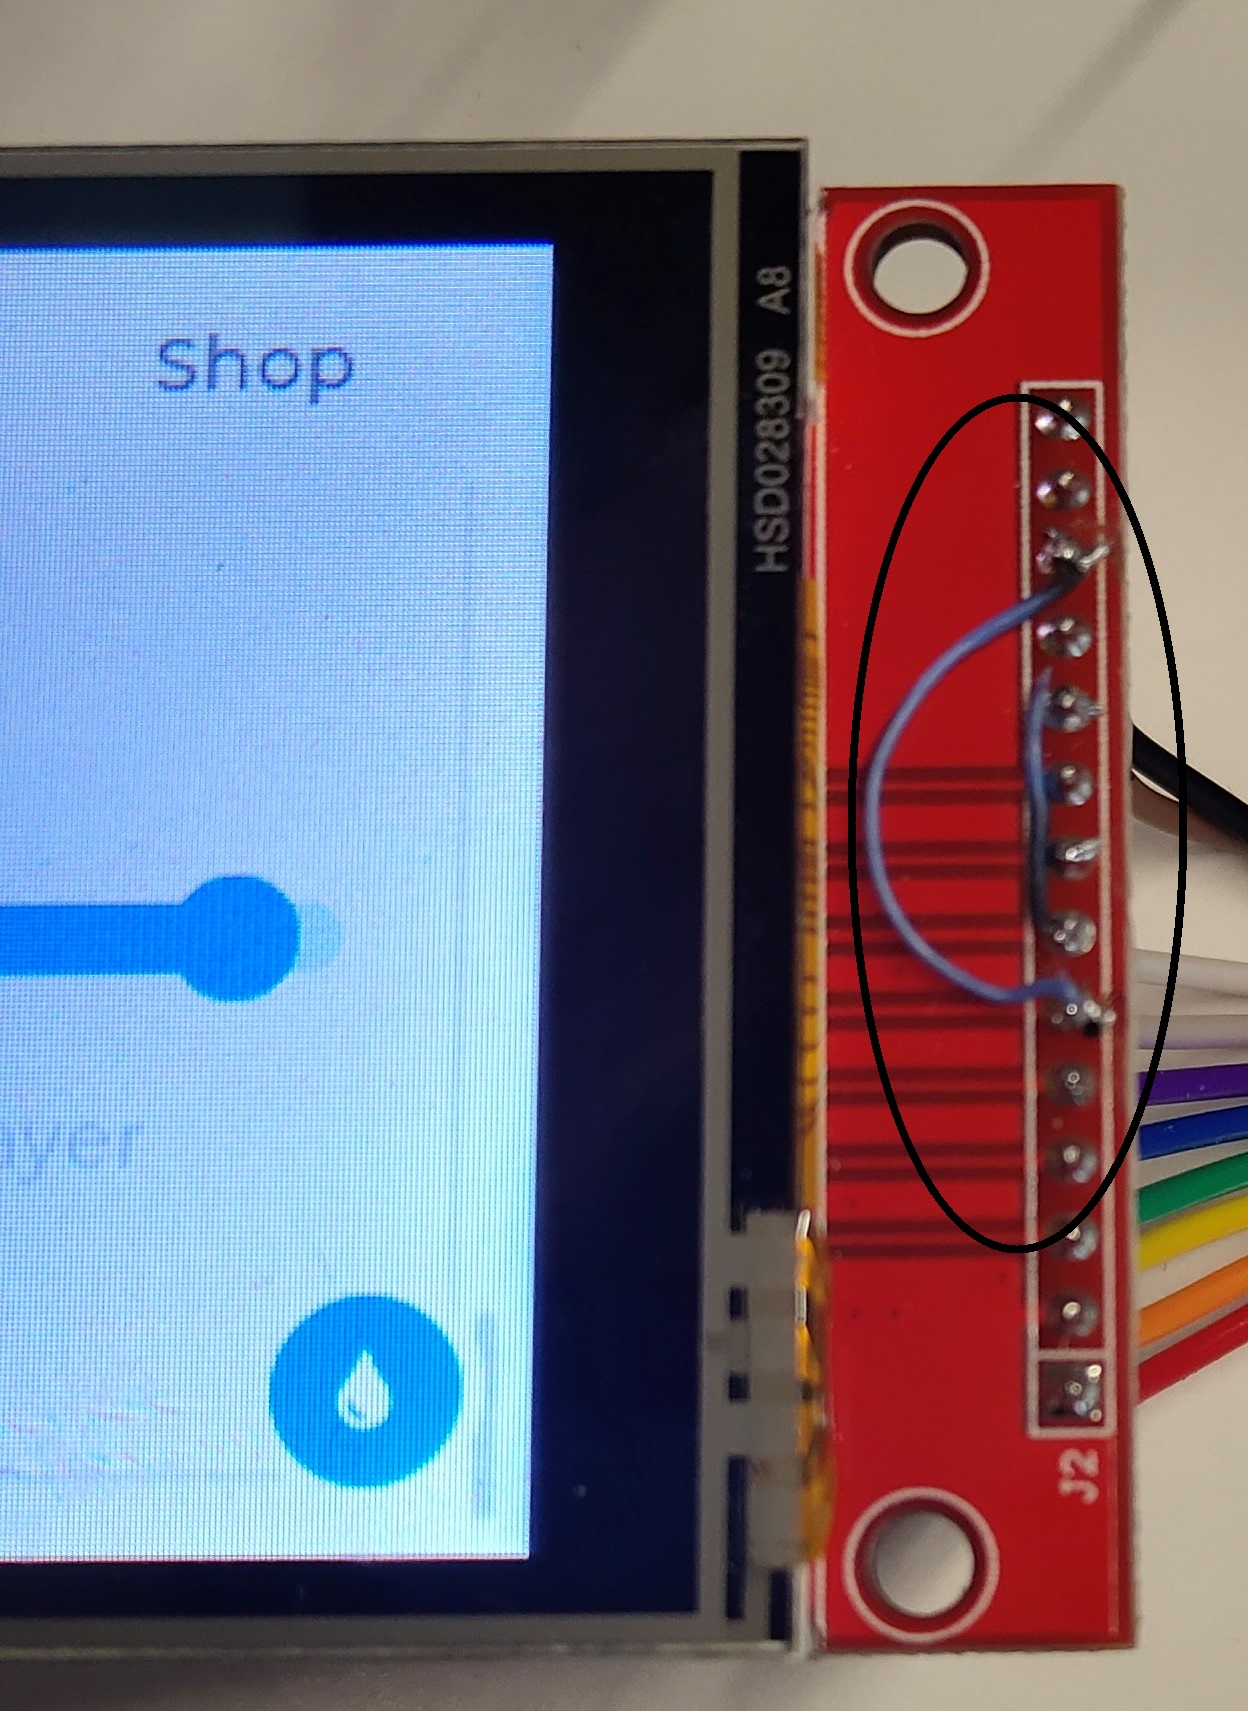
我直接在屏幕模块上进行了飞线处理,短接了T_DIN与SDI,以及T_CLK与SCK
1. 软件
1.1 TFT_eSPI库
- 安装TFT_eSPI库
- 选择对应屏幕的驱动
- 首先注释掉
User_Setup_Select.h中默认的驱动文件 
- 在
User_Setup_Select.h文件中找到相对应的驱动有文件,并取消注释 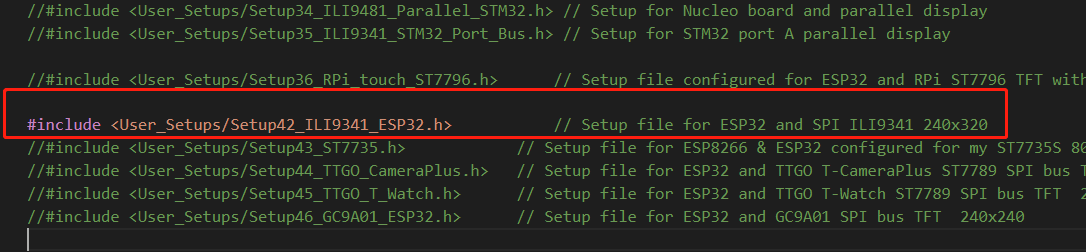
- 进入到选定的驱动头文件,本例中是
Setup42_ili9341_ESP32.h。取消TOUCH相关的注释,如下图。 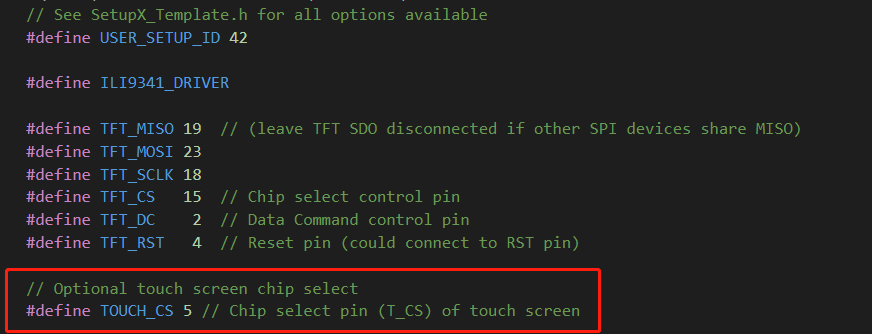
- 在该文件中,定义了每个引脚的引脚号,因此可以按照改文件进行接线。当然,若有必要,可以在此自行修改引脚号。
- 配置好以后,可以先运行TFT_eSPI的示例代码,看TFT屏幕是否运行成功。
- 首先注释掉
1.2 LVGL库
- 安装LVGL库
- 把examples和demos文件夹复制到lvgl/src目录下,目录结构如下:

- 在lvgl根目录下,复制一份
lv_conf_template.h到lvgl根目录,并重命名为lv_conf.h 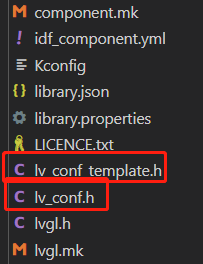
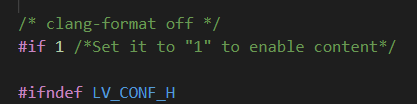
- 打开lv_conf.h文件,修改第15行的# if 0 为 # if 1,以开启后续的代码段。
- lv_conf.h文件,第27行可以修改颜色深度,默认16也可以。
- lv_conf.h文件,修改第88行,#define LV_TICK_CUSTOM 1设置为1,开启后续代码段。

- 至此,相关设置应该配置完毕,你可以开始写自己的代码了。如果要跑LVGL官方的demo,还需继续进行设置。
1.3 LVGL demos配置
- LVGL官方提供了多个demo,如图:
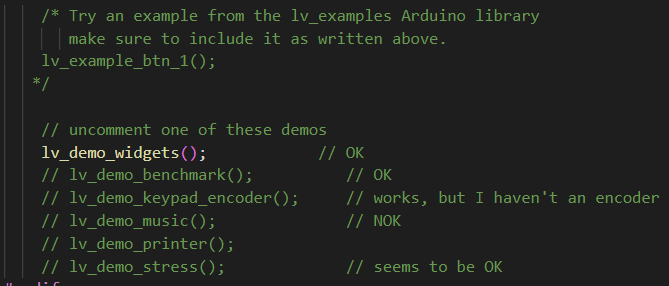
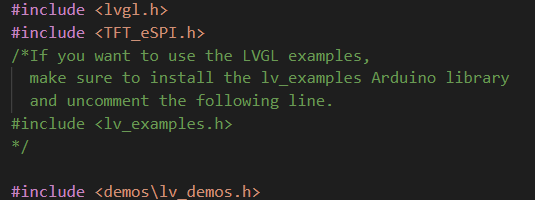
- 由于前文将demos文件夹进行了移动,放在了src目录下,因为头文件需要修改为:#include <demos\lv_demos.h>
- 在运行相关demo时,不仅需要解除相关注释,同时需要在lv_conf.h中进行配置;
- 以lv_demo_widgets();为例,取消注释后,在lv_conf.h第727行,修改0为1,以开启宏定义;

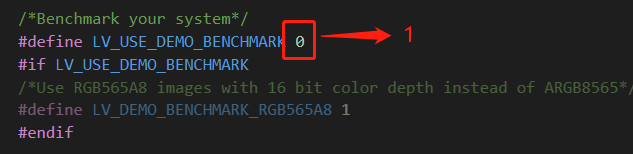
- 若想运行lv_demo_benchmark(),则需要将上述修改还原,并将736行的0修改为1
- 注意:每个demo仅能开启一个,其他无关demo需要注释掉,并在lv_conf.h中设置宏定义为0
- 文章最后附demos的main.cpp
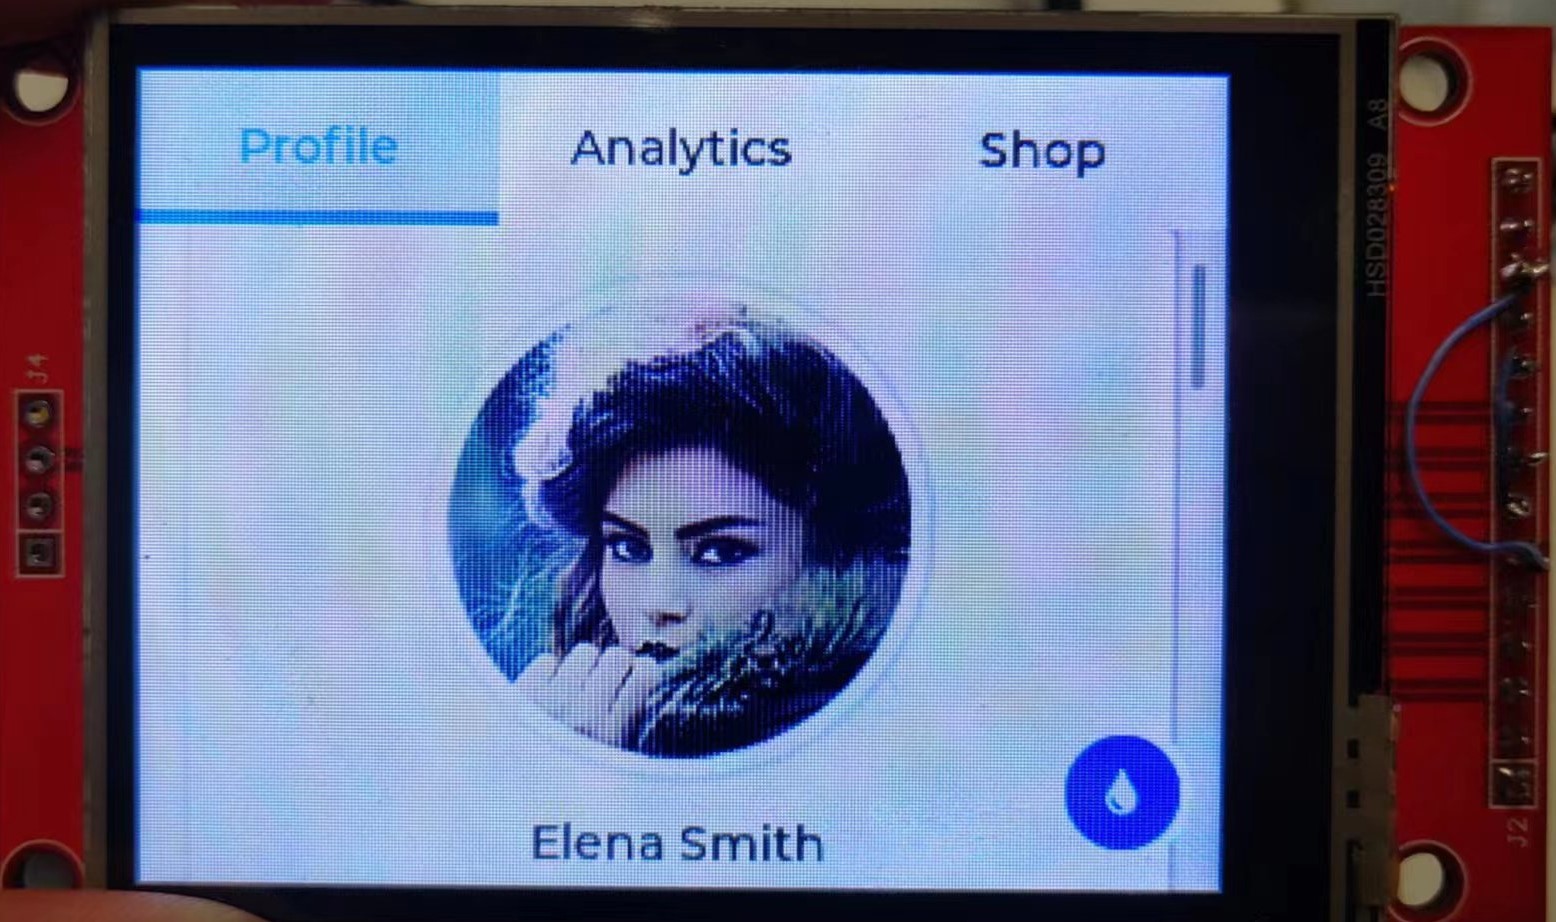
- 运行实际图如下:
1.4 触摸屏幕校准
有时候会出现屏幕触摸位置不准确的情况,此时需要进行屏幕校准。运行TFT_eSPI中的Touch_calibrate示例,按照提示依次点击屏幕四个角,最后会通过串口打印出校准数据,复制到main.cpp中即可;

1.5 demo示例的代码
#include <lvgl.h>
#include <TFT_eSPI.h>
/*If you want to use the LVGL examples,
make sure to install the lv_examples Arduino library
and uncomment the following line.
#include <lv_examples.h>
*/
#include <demos\lv_demos.h>
/*Change to your screen resolution*/
static const uint16_t screenWidth = 320;
static const uint16_t screenHeight = 240;
static lv_disp_draw_buf_t draw_buf;
static lv_color_t buf[ screenWidth * 10 ];
// TFT_eSPI tft = TFT_eSPI(screenWidth, screenHeight); /* TFT instance */
TFT_eSPI tft = TFT_eSPI(); // Invoke custom library
#if LV_USE_LOG != 0
/* Serial debugging */
void my_print(const char * buf)
{
Serial.printf(buf);
Serial.flush();
}
#endif
/* Display flushing */
void my_disp_flush( lv_disp_drv_t *disp, const lv_area_t *area, lv_color_t *color_p )
{
uint32_t w = ( area->x2 - area->x1 + 1 );
uint32_t h = ( area->y2 - area->y1 + 1 );
tft.startWrite();
tft.setAddrWindow( area->x1, area->y1, w, h );
tft.pushColors( ( uint16_t * )&color_p->full, w * h, true );
tft.endWrite();
lv_disp_flush_ready( disp );
}
/*Read the touchpad*/
void my_touchpad_read( lv_indev_drv_t * indev_driver, lv_indev_data_t * data )
{
uint16_t touchX, touchY;
bool touched = tft.getTouch( &touchX, &touchY, 600 );
if( !touched )
{
data->state = LV_INDEV_STATE_REL;
}
else
{
data->state = LV_INDEV_STATE_PR;
/*Set the coordinates*/
data->point.x = touchX;
data->point.y = touchY;
Serial.print( "Data x " );
Serial.println( touchX );
Serial.print( "Data y " );
Serial.println( touchY );
}
}
void setup()
{
Serial.begin( 115200 ); /* prepare for possible serial debug */
String LVGL_Arduino = "Hello Arduino! ";
LVGL_Arduino += String('V') + lv_version_major() + "." + lv_version_minor() + "." + lv_version_patch();
Serial.println( LVGL_Arduino );
Serial.println( "I am LVGL_Arduino" );
lv_init();
#if LV_USE_LOG != 0
lv_log_register_print_cb( my_print ); /* register print function for debugging */
#endif
tft.begin(); /* TFT init */
tft.setRotation( 1 ); /* Landscape orientation, flipped */
/*Set the touchscreen calibration data,
the actual data for your display can be acquired using
the Generic -> Touch_calibrate example from the TFT_eSPI library*/
// uint16_t calData[5] = { 275, 3620, 264, 3532, 1 };
uint16_t calData[5] = { 409, 3416, 335, 3321, 7 };
tft.setTouch( calData );
lv_disp_draw_buf_init( &draw_buf, buf, NULL, screenWidth * 10 );
/*Initialize the display*/
static lv_disp_drv_t disp_drv;
lv_disp_drv_init( &disp_drv );
/*Change the following line to your display resolution*/
disp_drv.hor_res = screenWidth;
disp_drv.ver_res = screenHeight;
disp_drv.flush_cb = my_disp_flush;
disp_drv.draw_buf = &draw_buf;
lv_disp_drv_register( &disp_drv );
/*Initialize the (dummy) input device driver*/
static lv_indev_drv_t indev_drv;
lv_indev_drv_init( &indev_drv );
indev_drv.type = LV_INDEV_TYPE_POINTER;
indev_drv.read_cb = my_touchpad_read;
lv_indev_drv_register( &indev_drv );
#if 0
/* Create simple label */
lv_obj_t *label = lv_label_create( lv_scr_act() );
lv_label_set_text( label, LVGL_Arduino.c_str() );
lv_obj_align( label, LV_ALIGN_CENTER, 0, 0 );
#else
/* Try an example from the lv_examples Arduino library
make sure to include it as written above.
lv_example_btn_1();
*/
// uncomment one of these demos
lv_demo_widgets(); // OK
// lv_demo_benchmark(); // OK
// lv_demo_keypad_encoder(); // works, but I haven't an encoder
// lv_demo_music(); // NOK
// lv_demo_printer();
// lv_demo_stress(); // seems to be OK
#endif
Serial.println( "Setup done" );
}
void loop()
{
lv_timer_handler(); /* let the GUI do its work */
delay( 5 );
}
Categories: 嵌入式
Comments